Sunday, February 2, 2014

Coming back from the abyss...

It has been over a year since I updated this Blog. I'd like to claim that I have made *some* kind of progress on the twins but the sad truth is that the A&S building is unsecured with the doors broken out/off and we are not likely to get electricity or water in the near future. Pretty depressing.

At any rate, I transferred my efforts to the IFC (Integrated Fire Control) area. It started out as my own form of makework... mostly to keep my sanity after the damage to the restoration work and tools, but it also was well received by the other volunteers and was desperately needed by the facility which has been falling apart faster than we could patch it back together.

I started with some simple patching of the storm damage to the InterConnecting Corridor:


Then I moved on to covering some humongous holes (4 foot square) in our generator building that were created when Sandy blew the metal vents off the roof. This is a building that we hope to set up for our Nike Museum. I converted this:


To this:


There's still a laundry list of things to be done, but the work continues.

Until next time.....

Blazing Skies!!!!!

Thursday, January 24, 2013

Then Sandy lowered the boom...

Well it's been about 90 days since I posted to this blog. I am sorry for the delay but I would like to plead "Guilty with an Explanation". Ten days after I posted my previous entry Hurricane Sandy hit the Jersey coast with a vengeance. The A&S building and the twins didn't do so well. My first view came on November 11th when NPS let me in with BJ & Pete DeMarco:


There was sand overwash everywhere and it appeared that the missiles and boosters were rammed through the front overhead door. Getting closer just made the bad feeling worse.


Yes, that's the compressor hanging upside down - and that, only because it was secured with chain to the wall!. We struggled to get inside. No small feat since everything had been floated against that end of the building. Inside was even more heartbreaking:


For comparison's sake, here is a before picture:


The sand blaster... gone! We eventually found it about 150 feet away and it was still filled with 100 pounds of blasting media.


After that, NPS decided they didn't want anyone back on the Hook for fear of unexploded ordinance. We were finally able to get back for a day on January 12th. With the generous help of the Fort Hancock Nike Association folks we were able to get the building secured. More on that the next post.

Blazing Skies!!!

Monday, October 15, 2012

Gettin' closer...

Saturday was a great day at the Hook. The weather at the shore was spectacular, not too hot and beautifully sunny. I brought the first of the fiberglass Ajax nosecones down to sand the excess fiberglass off and trim the polyurethane foam filler. I got it pried out of the mold - with some troubling spots on the mold that will need repair before I can cast the second one. But the good news is that this one looks great!


Then I got into a rhythm with the grinder and just wailed on the second missile. I made great headway in spite of busting two backing plates.


I broke the centers right out of them. But man was it worth it.


I still have a ways to go but it makes the trip a bit easier when you open the door to both missile bodies being almost all bare metal. A little bit more paint removal to go and we get to start a side project - I need a support to suspend these for painting. I found some pipe and first I'm going to try to fabricate a stand. More on that next time.

'til then.... Blazing Skies!!!

Monday, September 24, 2012

Alaskan Nike Vets, Friend in Germany and back to work..

Well, it been a while since I published my last Blog. I have been laying low. But all that came to an end with a week's worth of rejuvenation down at the Outer Banks of North Carolina followed by our site, NY56, hosting the Alaskan Nike Veteran's Reunion midweek and then a normal tour date Sunday.

I was looking forward to vacation more than usual this year, my work life having been truly stressed out. While my trips to the Hook were not as frequent as they might have been, I worked quite a bit on the Ajax nosecones for the Parrish's. I will devote a complete post to that project very soon (I'm almost done). For the moment here's a look at the plug being pulled from the mold the night I got back from vacation (it had been left to cure all week).


That forms the basis for the fiberglassing of the new nosecones.

That was last Sunday night. Then Wednesday we hosted the Alaska Nike Veterans. What a great bunch of guys!!! We had the benefit of having one of our own being a member of both groups - Pete DeMarco (who is also VP of our Fort Hancock Nike Association). We took them through all of our areas and turned 'em loose through Fort Hancock and I believe that everyone had a great time (I know I did).

When I got back home and checked my email I was surprised to find a real treasure;
a copy of TM 9-1970-2-35P from Michael Keller. My sincere Thanks!!! This manual has the schematics for the Ajax booster (JATO). All the while I was cutting into things willy nilly, here is the manual of how it should go together. Truly great for a project like this. I passed a copy along to Ed Thelen's site in the event anyone else out there should need this information.

All that on the first week back from vacation and the week not even over. Of course my daily driver decided to have a hissy fit and on the way back from midweek Vet Reunion started spewing steam. That makes both Lincolns the 01 and the 05 deadlined by cooling issues. Ugh! The coolant pipe and the thermostat housing are cast in PLASTIC and at least on the 05, that is what is leaking from a crack in the seam. Wish they made half as good as the twins are made! So Sunday I broke out the Shelby for the run down to the Hook. He doesn't like the summer heat but it was 60 and sunny so the drive was magnificent.


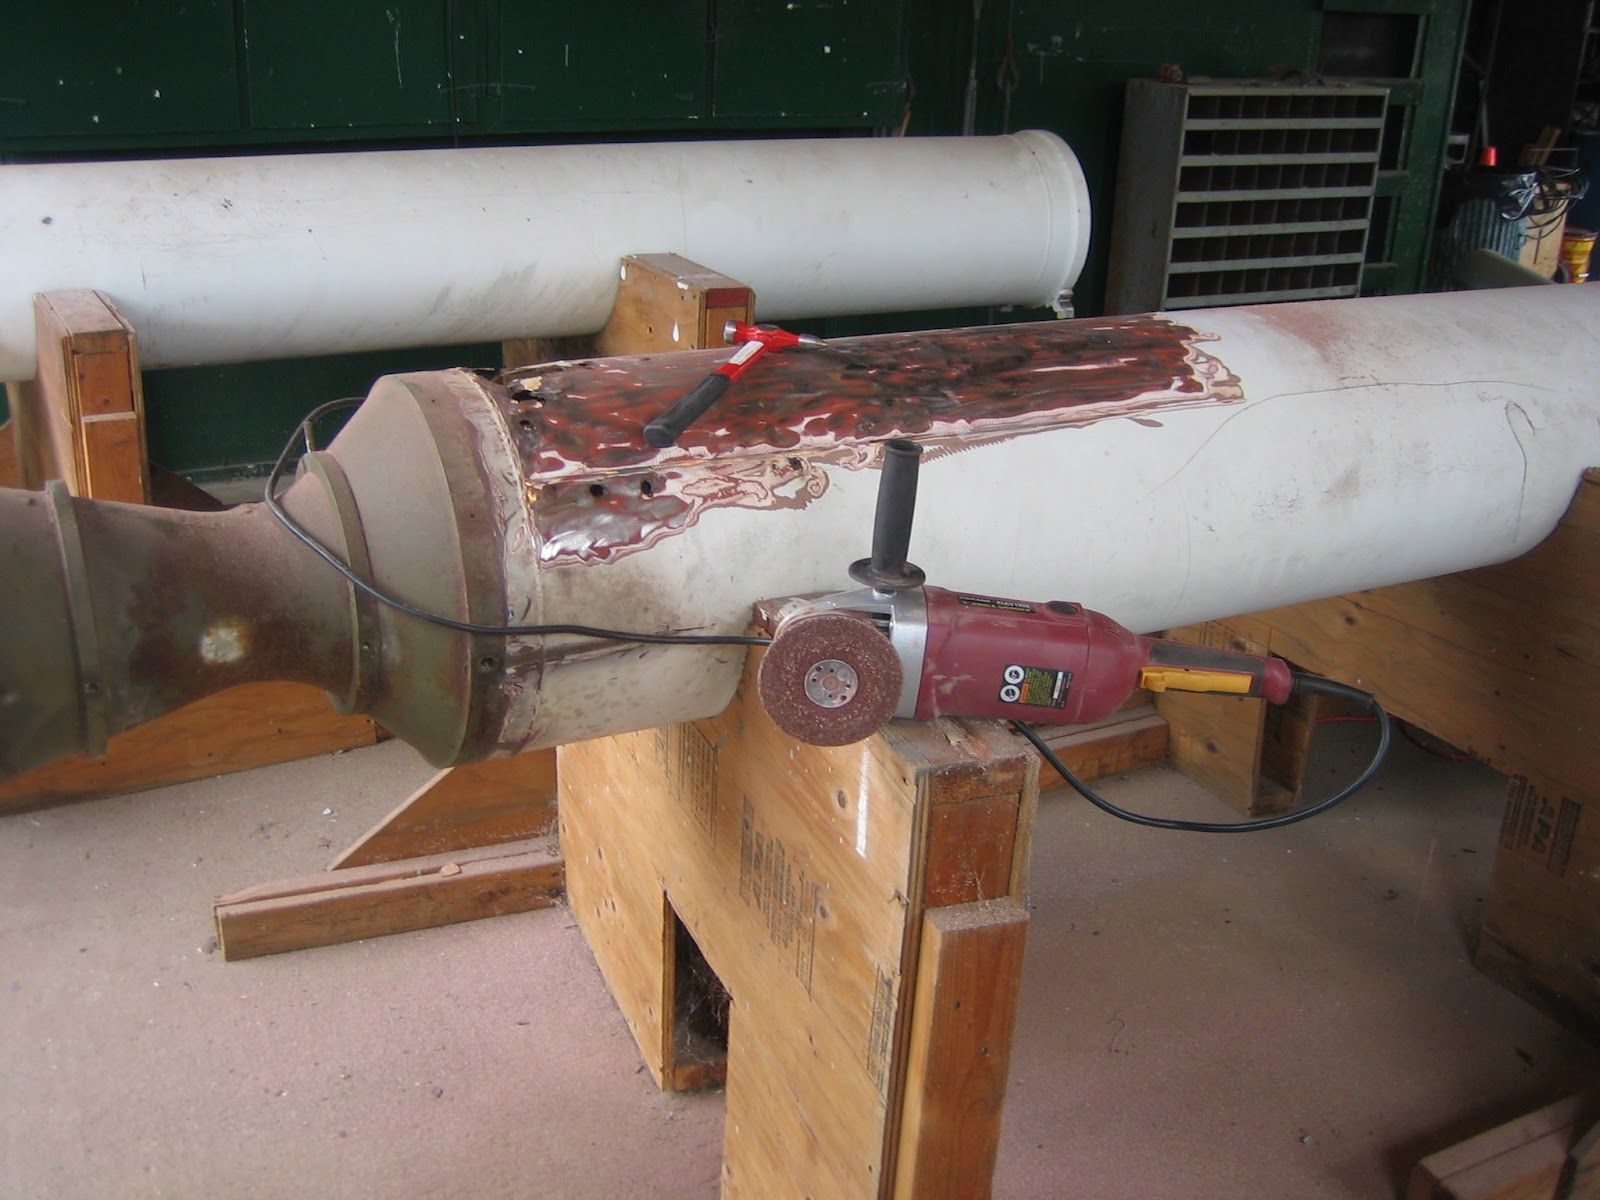
I worked a bunch on Castor but it doesn't look like much. I had to clean up the connecting areas between the tanks - the large grinder can't get in. So I worked the area with a stiff wire wheel. It will still need to be sandblasted for paint-prep but it won't use as much of the abrasive.


Finishing up the day I spent a bit more time on the booster. Good Lord is there a lot of paint on these things. I probably swept up 4 pounds worth, and that was what I could get to easily!


Slowly but surely it's all coming together. After all this I get to do it again on Pollux <g>.
Hey, nobody said it was easy.
'Til next time....

Blazing Skies

Monday, August 6, 2012

Surface Prep and more surface prep...

Even I was getting tired of the "grinding" references, yet that is, in fact, the bulk of my time nowadays. The key to any restoration is surface preparation. In the case of the twins, it is a combination of the removal of many, many years worth of very different coatings as well as getting a stable foundation for the repair work on the horizon. Here I have gotten to a point where I can concentrate on the bodywork necessary to have Castor appear "whole" (as in not have any holes that were not meant to be there!).


Pollux has similar areas corroded through which must be reconstructed in order to hold a good paint job.

The work project itself gets *very* tedious at this point. The physical effort of grinding is wearing on many levels (pun not intended). For starters it is hot and humid so it is difficult to wear much more than a T shirt and the paint dust smells bad as well as having the same vibration and noise that goes right through you like a dentist's drill. When you stop for a break you, can watch the sweat carve little canals in the paint dust that is stuck to your arms. And your arms feel like lead after supporting and guiding the 9 inch grinder carefully to avoid gouging into the alloy portions. You cannot allow the full weight of the grinder to rest on the material - there is a harmony you achieve where you sense what the "right" pressure is to get the paint off but not damage the underlying bodywork. Rest breaks are taken when you can no longer manage that balance.

For kicks, and a diversion, I grabbed a booster fin and set it up on a garbage can. I tested the grinding disc on that and was happy that it stripped even easier than the missile body. For what it's worth, the alloy that they used for the fins is quite hard and actually dulled my grinding disc before I had finished on side!


I do not believe that I am going to use Body Filler (Bondo) on these fins - although that is some of what I am grinding off. Prior refinishing work made these to appear more "perfect" than I believe that they were meant to be. I want the screws and rivets to be seen as they would have been in their original state. If you have ever seen pictures of the German V-2, the surface is actually rather dimpled. There was no provision to add weight to make them "look nice"; it was only necessary to assure that they would not delaminate at  speeds well in excess of Mach 1. Any weight added to the missile body would be that much less that the payload could be.

Anyway, that about it for this week's trip.

A Special "shout-out" to "Nick the History Kid" - it was great having you and your Dad stop by and look around. Good luck with your work!

That's it for now......

Blazing Skies!!!

Saturday, July 28, 2012

The long hard grind continues...

I have been working this project for quite a while now and believe I have finally zeroed in on a suitable method for removing the excessive number of disparate paint coatings that have been layered on over the years. When I started, I began with Aircraft Stripper - primarily since it is the most caustic that I could find, but would not affect the structure; but that took multiple passes and still met with only limited success. It also does not work well in the heat because it needs to stay moist in order to chemically soften the paint. When that did not make much headway I then began trying an industrial wire wheel with knotted stainless steel bristles. That worked better but still had trouble where the coatings were really built up. The wheel would "smear" the paint before it eventually came off, and it took quite a bit of time and effort. All of this was a means of working from the least intrusive method in order to find a system that would not result in more refinishing work after the coatings were removed.

Well last trip while working around a rust-out on one of the boosters I was doing basic bodywork using a 9" grinder and a 24 grit disc - then using a "ding" hammer to test the soundness of the rust spots. I was having a tough week so I kept going with the grinder and after a couple hours had removed all the coatings. What I found interesting was that when I went back this week I could still see the remains of the manufacturers production paint markings - so obviously I wasn't introducing more damage. This picture does not do it justice but you can just about make out the NK - 5 - 63


Having had such good fortune with this, I decided to try the same method on Castor. Before I started the section looked like this:


After a day of manning the grinder (and working with 16, 24 and 32 grit discs) I ended up with this:


I must say it was pretty satisfying.The really, really cool part was when I was working the booster nozzle. It must have a high magnesium content because it was throwing long Blue-White sparks from the disc maybe 2 - 3 inches! I will still need to sandblast the connecting structures since the disk cannot fit in there but it did an outstanding job on both the corrosion on the alloy tanks and the rust on the steel tank (as much as anything could).


You can also get an idea of how much material was removed by looking at the layer on the floor. I swept up several pounds of ground paint.

Next trip I will get help to roll these babies over and finish the removal


'til next time....

Blazing Skies!!!


Wednesday, July 18, 2012

Bump & grind in the heat

Sunday was quite a day at the Hook. We had a Distinguished Guest from the Denmark Cold War Museum as well as a couple of other visitors touring the Launch Area. It was another really hot day... I don't know if it hit triple digits but it sure was hot and humid. The weather notwithstanding it was also one of those brutal personal weeks we go through from time to time...

I started the day by deciding to work on the boosters. It was an extension of getting the lanyard off the missile last week; it just seemed appropriate to get the other end off the boosters.


That led to setting up the grinders and wire wheels and figuring that it should come out fairly easily. I was even able to get an impact gun on it but it just spun. So I took a picture of the inside to see what I was dealing with.


It should have been simple enough, but I did not have a six point wrench and it continued to round out. There are times I wish I could step back and laugh at myself at  the time I am going through this stuff. Instead I dug my heels in and used a cut-off wheel to remove the piece.


By then I was really getting hot (and not just because of the weather) so I started taking out my aggression on the booster's paint. This work would have had to get done regardless but a saner man might have waited for cooler weather. Oh well.  I began by testing the degree of rust that would need repair. This was done by grinding the paint off and using a body pick hammer to pick at the rust spots to find the weak spots.


It was around about this point that BJ brought Mr Thomas Pedersen from Denmark to the A&S building. I showed him the twins and described my thoughts on the restoration project. We had a very nice conversation but he had a limited time frame and had to keep going. I went back to grinding...


I felt that the grinder was a more cost effective paint removal tool than using the paint stripper (at $100/gal) and it provided a means of releasing aggression. It might not have been the best of days to attack this particular piece of the project but it all has to get done.

I will probably be a bit calmer when I can get this booster in primer and then Olive Drab <grin>

'til next time....

Blazing Skies