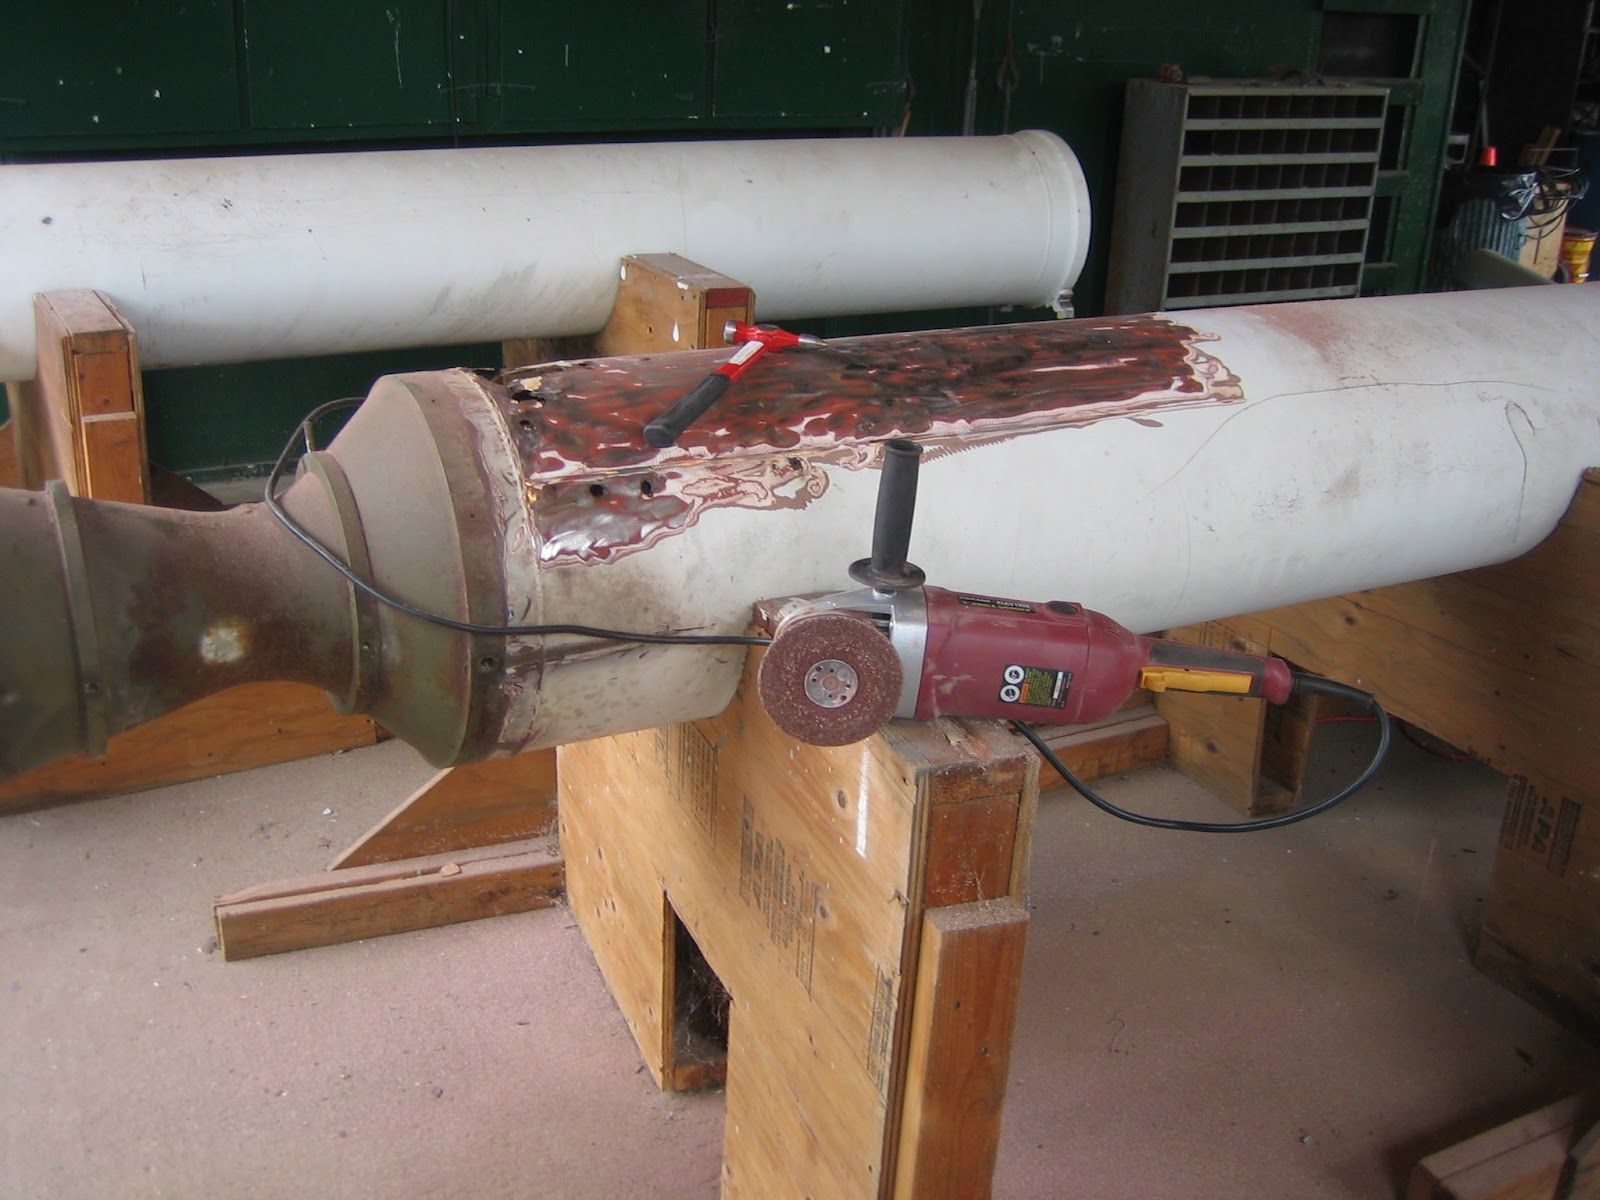
Even I was getting tired of the "grinding" references, yet that is, in fact, the bulk of my time nowadays. The key to any restoration is surface preparation. In the case of the twins, it is a combination of the removal of many, many years worth of very different coatings as well as getting a stable foundation for the repair work on the horizon. Here I have gotten to a point where I can concentrate on the bodywork necessary to have Castor appear "whole" (as in not have any holes that were not meant to be there!).
Pollux has similar areas corroded through which must be reconstructed in order to hold a good paint job.
The work project itself gets *very* tedious at this point. The physical effort of grinding is wearing on many levels (pun not intended). For starters it is hot and humid so it is difficult to wear much more than a T shirt and the paint dust smells bad as well as having the same vibration and noise that goes right through you like a dentist's drill. When you stop for a break you, can watch the sweat carve little canals in the paint dust that is stuck to your arms. And your arms feel like lead after supporting and guiding the 9 inch grinder carefully to avoid gouging into the alloy portions. You cannot allow the full weight of the grinder to rest on the material - there is a harmony you achieve where you sense what the "right" pressure is to get the paint off but not damage the underlying bodywork. Rest breaks are taken when you can no longer manage that balance.
For kicks, and a diversion, I grabbed a booster fin and set it up on a garbage can. I tested the grinding disc on that and was happy that it stripped even easier than the missile body. For what it's worth, the alloy that they used for the fins is quite hard and actually dulled my grinding disc before I had finished on side!
I do not believe that I am going to use Body Filler (Bondo) on these fins - although that is some of what I am grinding off. Prior refinishing work made these to appear more "perfect" than I believe that they were meant to be. I want the screws and rivets to be seen as they would have been in their original state. If you have ever seen pictures of the German V-2, the surface is actually rather dimpled. There was no provision to add weight to make them "look nice"; it was only necessary to assure that they would not delaminate at speeds well in excess of Mach 1. Any weight added to the missile body would be that much less that the payload could be.
Anyway, that about it for this week's trip.
A Special "shout-out" to "Nick the History Kid" - it was great having you and your Dad stop by and look around. Good luck with your work!
That's it for now......
Blazing Skies!!!
Monday, August 6, 2012
Saturday, July 28, 2012
The long hard grind continues...
I have been working this project for quite a while now and believe I have finally zeroed in on a suitable method for removing the excessive number of disparate paint coatings that have been layered on over the years. When I started, I began with Aircraft Stripper - primarily since it is the most caustic that I could find, but would not affect the structure; but that took multiple passes and still met with only limited success. It also does not work well in the heat because it needs to stay moist in order to chemically soften the paint. When that did not make much headway I then began trying an industrial wire wheel with knotted stainless steel bristles. That worked better but still had trouble where the coatings were really built up. The wheel would "smear" the paint before it eventually came off, and it took quite a bit of time and effort. All of this was a means of working from the least intrusive method in order to find a system that would not result in more refinishing work after the coatings were removed.
Well last trip while working around a rust-out on one of the boosters I was doing basic bodywork using a 9" grinder and a 24 grit disc - then using a "ding" hammer to test the soundness of the rust spots. I was having a tough week so I kept going with the grinder and after a couple hours had removed all the coatings. What I found interesting was that when I went back this week I could still see the remains of the manufacturers production paint markings - so obviously I wasn't introducing more damage. This picture does not do it justice but you can just about make out the NK - 5 - 63
Having had such good fortune with this, I decided to try the same method on Castor. Before I started the section looked like this:
After a day of manning the grinder (and working with 16, 24 and 32 grit discs) I ended up with this:
I must say it was pretty satisfying.The really, really cool part was when I was working the booster nozzle. It must have a high magnesium content because it was throwing long Blue-White sparks from the disc maybe 2 - 3 inches! I will still need to sandblast the connecting structures since the disk cannot fit in there but it did an outstanding job on both the corrosion on the alloy tanks and the rust on the steel tank (as much as anything could).
You can also get an idea of how much material was removed by looking at the layer on the floor. I swept up several pounds of ground paint.
Next trip I will get help to roll these babies over and finish the removal
'til next time....
Blazing Skies!!!
Well last trip while working around a rust-out on one of the boosters I was doing basic bodywork using a 9" grinder and a 24 grit disc - then using a "ding" hammer to test the soundness of the rust spots. I was having a tough week so I kept going with the grinder and after a couple hours had removed all the coatings. What I found interesting was that when I went back this week I could still see the remains of the manufacturers production paint markings - so obviously I wasn't introducing more damage. This picture does not do it justice but you can just about make out the NK - 5 - 63
Having had such good fortune with this, I decided to try the same method on Castor. Before I started the section looked like this:
After a day of manning the grinder (and working with 16, 24 and 32 grit discs) I ended up with this:
I must say it was pretty satisfying.The really, really cool part was when I was working the booster nozzle. It must have a high magnesium content because it was throwing long Blue-White sparks from the disc maybe 2 - 3 inches! I will still need to sandblast the connecting structures since the disk cannot fit in there but it did an outstanding job on both the corrosion on the alloy tanks and the rust on the steel tank (as much as anything could).
You can also get an idea of how much material was removed by looking at the layer on the floor. I swept up several pounds of ground paint.
Next trip I will get help to roll these babies over and finish the removal
'til next time....
Blazing Skies!!!
Wednesday, July 18, 2012
Bump & grind in the heat
Sunday was quite a day at the Hook. We had a Distinguished Guest from the Denmark Cold War Museum as well as a couple of other visitors touring the Launch Area. It was another really hot day... I don't know if it hit triple digits but it sure was hot and humid. The weather notwithstanding it was also one of those brutal personal weeks we go through from time to time...
I started the day by deciding to work on the boosters. It was an extension of getting the lanyard off the missile last week; it just seemed appropriate to get the other end off the boosters.
That led to setting up the grinders and wire wheels and figuring that it should come out fairly easily. I was even able to get an impact gun on it but it just spun. So I took a picture of the inside to see what I was dealing with.
It should have been simple enough, but I did not have a six point wrench and it continued to round out. There are times I wish I could step back and laugh at myself at the time I am going through this stuff. Instead I dug my heels in and used a cut-off wheel to remove the piece.
By then I was really getting hot (and not just because of the weather) so I started taking out my aggression on the booster's paint. This work would have had to get done regardless but a saner man might have waited for cooler weather. Oh well. I began by testing the degree of rust that would need repair. This was done by grinding the paint off and using a body pick hammer to pick at the rust spots to find the weak spots.
It was around about this point that BJ brought Mr Thomas Pedersen from Denmark to the A&S building. I showed him the twins and described my thoughts on the restoration project. We had a very nice conversation but he had a limited time frame and had to keep going. I went back to grinding...
I felt that the grinder was a more cost effective paint removal tool than using the paint stripper (at $100/gal) and it provided a means of releasing aggression. It might not have been the best of days to attack this particular piece of the project but it all has to get done.
I will probably be a bit calmer when I can get this booster in primer and then Olive Drab <grin>
'til next time....
Blazing Skies
I started the day by deciding to work on the boosters. It was an extension of getting the lanyard off the missile last week; it just seemed appropriate to get the other end off the boosters.
That led to setting up the grinders and wire wheels and figuring that it should come out fairly easily. I was even able to get an impact gun on it but it just spun. So I took a picture of the inside to see what I was dealing with.
It should have been simple enough, but I did not have a six point wrench and it continued to round out. There are times I wish I could step back and laugh at myself at the time I am going through this stuff. Instead I dug my heels in and used a cut-off wheel to remove the piece.
By then I was really getting hot (and not just because of the weather) so I started taking out my aggression on the booster's paint. This work would have had to get done regardless but a saner man might have waited for cooler weather. Oh well. I began by testing the degree of rust that would need repair. This was done by grinding the paint off and using a body pick hammer to pick at the rust spots to find the weak spots.
It was around about this point that BJ brought Mr Thomas Pedersen from Denmark to the A&S building. I showed him the twins and described my thoughts on the restoration project. We had a very nice conversation but he had a limited time frame and had to keep going. I went back to grinding...
I felt that the grinder was a more cost effective paint removal tool than using the paint stripper (at $100/gal) and it provided a means of releasing aggression. It might not have been the best of days to attack this particular piece of the project but it all has to get done.
I will probably be a bit calmer when I can get this booster in primer and then Olive Drab <grin>
'til next time....
Blazing Skies
Monday, July 9, 2012
Hot times...
We were touching triple digits at Sandy Hook on Saturday. BJ, Paul and Tony were baking up in the IFC Vans giving tours to the few people who weren't in the water. There's essentially no airflow in the radar vans due to the lack of electricity. By Three in the afternoon we were all ready to pack it in. This was somewhat reminiscent of the summer my Uncle brought me to Fort Bliss to learn how to be a 16C10 Fire Control Crewman. That summer we had more than 20 days over 110 degrees (and we still bivouacked in our olive drab fatigues!).
The day started with a fairly heavy stoppage of traffic on the Garden State Parkway already at 9:30 in the morning so I knew what I was in for. I was looking forward to this day though - last week I had almost gotten at all the fasteners and bolts for Castor's nose section. This week, I started the day by removing it:
This brings both missiles to the point maximum point of dis-assembly for this project. There are still a few pieces to be removed, but the condition of these trunk sections makes further breakdown more precarious than useful.
Case in point; The Igniter switch. This is a switch connected externally by lanyard to the booster and internally to a rod going to the rocket motor. As the booster burned out and started to drop away the lanyard triggered the Missile's motor to start. As you can see, the surrounding material is rather corroded from the caustic fuels and years of deterioration:
It will be difficult enough to repair the missing material without attempting further diss-assembly. Perhaps with better core components but I will be grateful to get these looking normal. As it was, I managed to remove the switch sufficiently intact to rebuild and remount it:
I finished off by sandblasting the crap off the bolt-heads holding the fuel doors in (note - this is something that should be avoided at all costs in extremely hot weather with just a T shirt on. The blasting media instantly bonds with the sweat to cake you in an uncomfortable black wrapping). Here's one of them with ready to be stripped and refinished:
The project is moving along. Like any restoration from this level of decay the next few weeks are going to be tough.
Now the project moves into the "less glamorous" phase; all the bolts which had to be drilled out or cut off must be dealt with; some will come out with easy outs, some will refuse to cooperate at all but *all* must be accounted for or replaced in some manner to get the missiles back together. I say less glamorous since this work tends to be a veritable time-sink. You can work your ass off and at the end of the day not have it "look" like you did anything. For the mental health value alone, this is when I will intersperse some of the early refinishing. Back to visual progress!!
Til next time...
Blazing Skies
The day started with a fairly heavy stoppage of traffic on the Garden State Parkway already at 9:30 in the morning so I knew what I was in for. I was looking forward to this day though - last week I had almost gotten at all the fasteners and bolts for Castor's nose section. This week, I started the day by removing it:
This brings both missiles to the point maximum point of dis-assembly for this project. There are still a few pieces to be removed, but the condition of these trunk sections makes further breakdown more precarious than useful.
Case in point; The Igniter switch. This is a switch connected externally by lanyard to the booster and internally to a rod going to the rocket motor. As the booster burned out and started to drop away the lanyard triggered the Missile's motor to start. As you can see, the surrounding material is rather corroded from the caustic fuels and years of deterioration:
It will be difficult enough to repair the missing material without attempting further diss-assembly. Perhaps with better core components but I will be grateful to get these looking normal. As it was, I managed to remove the switch sufficiently intact to rebuild and remount it:
I finished off by sandblasting the crap off the bolt-heads holding the fuel doors in (note - this is something that should be avoided at all costs in extremely hot weather with just a T shirt on. The blasting media instantly bonds with the sweat to cake you in an uncomfortable black wrapping). Here's one of them with ready to be stripped and refinished:
The project is moving along. Like any restoration from this level of decay the next few weeks are going to be tough.
Now the project moves into the "less glamorous" phase; all the bolts which had to be drilled out or cut off must be dealt with; some will come out with easy outs, some will refuse to cooperate at all but *all* must be accounted for or replaced in some manner to get the missiles back together. I say less glamorous since this work tends to be a veritable time-sink. You can work your ass off and at the end of the day not have it "look" like you did anything. For the mental health value alone, this is when I will intersperse some of the early refinishing. Back to visual progress!!
Til next time...
Blazing Skies
Monday, June 25, 2012
Gettin back at it...
Sunday was the tour date for the NY56 Site so I made my way down to Sandy Hook. Since I have not made the time to work on my dead-lined vehicle, I drove down with Sandy and our 10 month old Golden Retriever, Quincey in Sandy's Durango. I dropped them off on the Bay side and went to work at the A&S Building. BJ and Paul were the only guides doing the IFC tours so it was quiet in the LA (Launch Area). A good day to make up for some lost time! I started with an etching primer on the nosecone I have to reproduce for the Parrish boys down in Texas. That will allow me to cast their copies in Fiberglass and resin. This was the nosecone from Pollux - I had yet to remove the end of Castor. Today, I rectified that issue. Here's the twins' nosecones:
And for anyone following this, the reason that Castor's is longer is that I did not drill out the rivets to separate the intermediary piece.
Prior to removing the nosecone I had to remove the 4 tunnels on the nose as well as one on the main body. The tunnels are just that, aluminum fairings that provide protected channels for the electrical, hydraulic and fueling systems. They were designed to protect these systems from the atmosphere but not from manhandling. Here is one that took some abuse and will need to be repaired:
These tunnels are screwed into machined stand-offs which in turn are screwed into the missile body. After working through several dozen using a variety of dis-assembly techniques, the best means of removal turns out to be drilling the hardened screw head out
BTW, I would like to send out a sincere Thanks to Bob Price for a really great tip on how to do this economically:
And for anyone following this, the reason that Castor's is longer is that I did not drill out the rivets to separate the intermediary piece.
Prior to removing the nosecone I had to remove the 4 tunnels on the nose as well as one on the main body. The tunnels are just that, aluminum fairings that provide protected channels for the electrical, hydraulic and fueling systems. They were designed to protect these systems from the atmosphere but not from manhandling. Here is one that took some abuse and will need to be repaired:
These tunnels are screwed into machined stand-offs which in turn are screwed into the missile body. After working through several dozen using a variety of dis-assembly techniques, the best means of removal turns out to be drilling the hardened screw head out
BTW, I would like to send out a sincere Thanks to Bob Price for a really great tip on how to do this economically:
While making a knife I found a way to drill really hard
steel (R60) Tungsten Carbide bits are insanely expensive and the blade had
burnt up even cobalt bits. What to do? I had a cheapie masonry bit, I dressed
it on a diamond stone to lower the trailing edge of the carbide so it looked
like a bit for steel. Damn if it didn't drill right through!
With the screws out, the tunnel comes off and the stand-offs can be removed with a socket and an impact gun (of course I will need to create new ones for assembly).
So at the end of the day I am getting towards the end of dis-assembly. There are two more primary pieces on this missile to remove and then it will be grinding, sandblasting and structural reconstruction for the pair.
So, 'til next time.....
Blazing Skies
Sunday, June 17, 2012
No Missile work today...
The day started out out so promising! The weather was amazing; good sunshine, a few wispy clouds moved around by a gentle breeze - I was truly looking forward to a great day at the Hook.
I drive about an hour to get down to Sandy Hook (much longer in summer traffic). The time is split between a run down the Garden State Parkway and Route 36. I have been driving my 2001 Lincoln LS. Her name is Onyx and she's got 203+ thousand miles on the odometer.
Well Saturday, out of the blue, her computer screeched with a message CHECK ENGINE TEMP and she proceeded to belch a large cloud of steam from the front end. I pulled over into a Burger King parking lot and popped the hood. I was greeted by the upper radiator hose blowing just about that same time. After the steam had cleared and she had cooled down some:
BJ called and I gave him the bad news - later Tony T called to follow up.
I tried everything I could to get her cobbled back together but the final blow was when I attempted to restart her and the battery just went click, click , click. Dejected, I called AAA and arranged for a flatbed tow truck to take us back home. The twins would have to wait for another day.
I drive about an hour to get down to Sandy Hook (much longer in summer traffic). The time is split between a run down the Garden State Parkway and Route 36. I have been driving my 2001 Lincoln LS. Her name is Onyx and she's got 203+ thousand miles on the odometer.
Well Saturday, out of the blue, her computer screeched with a message CHECK ENGINE TEMP and she proceeded to belch a large cloud of steam from the front end. I pulled over into a Burger King parking lot and popped the hood. I was greeted by the upper radiator hose blowing just about that same time. After the steam had cleared and she had cooled down some:
BJ called and I gave him the bad news - later Tony T called to follow up.
I tried everything I could to get her cobbled back together but the final blow was when I attempted to restart her and the battery just went click, click , click. Dejected, I called AAA and arranged for a flatbed tow truck to take us back home. The twins would have to wait for another day.
Monday, June 4, 2012
The Nose knows....
Sunday was one of those days. I got up and drove down to Sandy Hook on autopilot. I would have enjoyed sleeping in, but there are just too many loose ends on the project. One of those loose ends is the preparation of the missile nosecone for fiberglass casting. If you've been following this story, there are two fella's in Texas who are also fixing a pair of Ajax missiles - except theirs came without the nosecones. I offered to mold them a pair based on one of mine. So in preparation of that process, the part has to be stripped and cleaned and primed to be able to apply the coatings that will prevent the fiberglass from bonding to the original part. They had sent me the collar from their missile and I had a similar one on mine, but I could not separate it from the nose for love nor money.
Even the conversations with Richard in Texas had reinforced the belief that the unit was held together by the three setscrews. Well, long story short, a couple of hours of banging and prying and cussing had yielded absolutely nothing. So like any project, sometimes you just have to move it along with what you've got. I knew I could cast the entire structure and trim it to the correct size but first I had to strip it down. That's when I had my Aha! moment:
Damned if this wasn't also held together with rivets!!! (and a lot of paint). So I cleaned the rest of the unit, drilled out the rivets and behold, now I could beat the thing apart (no, it still didn't just pull apart but required some judicious pounding.
The day itself was good on many levels. Of course it's always helpful to make a breakthrough on a problem, but Sunday was a tour day in the Launch Area as well. Bill and Tony brought several groups by to see the restoration project as well as two of the National Park Service Rangers. It is always a pleasure to show the progress made and to describe the plans for the finishing of these missiles. Slowly but surely our NY56 Nike Volunteer group is moving forward. We're doing more and have more to show. It's great to be a part of it.
'til next time.... Blazing Skies!!!!
Even the conversations with Richard in Texas had reinforced the belief that the unit was held together by the three setscrews. Well, long story short, a couple of hours of banging and prying and cussing had yielded absolutely nothing. So like any project, sometimes you just have to move it along with what you've got. I knew I could cast the entire structure and trim it to the correct size but first I had to strip it down. That's when I had my Aha! moment:
Damned if this wasn't also held together with rivets!!! (and a lot of paint). So I cleaned the rest of the unit, drilled out the rivets and behold, now I could beat the thing apart (no, it still didn't just pull apart but required some judicious pounding.
The day itself was good on many levels. Of course it's always helpful to make a breakthrough on a problem, but Sunday was a tour day in the Launch Area as well. Bill and Tony brought several groups by to see the restoration project as well as two of the National Park Service Rangers. It is always a pleasure to show the progress made and to describe the plans for the finishing of these missiles. Slowly but surely our NY56 Nike Volunteer group is moving forward. We're doing more and have more to show. It's great to be a part of it.
'til next time.... Blazing Skies!!!!
Subscribe to:
Posts (Atom)